Change your business address
If you're a full access user, you can update your business, registered, mailing and personal addresses within Online for Business and the Business banking app.
The options available depend on the products you use. Below is an explanation of all the possible Fields you will see:
|
Field |
Description |
|---|---|
|
Field Entity |
Description Entity that this authorisation is to apply to. Click the magnifying glass icon to select. Wildcard if it applies to all types. |
|
Field Type |
Description Transaction type that this authorisation is to apply to. Select from the dropdown list: New, Amend, or Message. Wildcard if it applies to all types. |
|
Field Product |
Description Product that this authorisation is to apply to. Select from the dropdown list. Wildcard if it applies to all types. |
|
Field Sub Product Type |
Description The sub product type for the selected product, if applicable. The Sub product type is available only for Banker's Guarantee. |
|
Field Product Type |
Description The product type for the selected product, if applicable. |
|
Field Tenor |
Description The period the Banker's Guarantee is defined for. It is valid from the date of application to the expiry date. Selecting any of the options starts the period of the application from 0 days. For example, selecting 'From 1 Year to 3 Year' means from 0 days to 3 years. Similarly, selecting 'From 3 Year to 5 Year' means from 0 days to 5 years. This field is displayed only for product Banker's Guarantee. |
|
Field Sub Type |
Description The sub type code for amending a BG. Valid values are: Release and *. |
|
Field Limit Amount |
Description The Currency code and maximum amount authorised for the specified combination of type, product. Click the magnifying glass icon to display and select from a list of valid currency codes. |
|
Field Verify |
Description Click this box if a user with the 'Verifier' permission must verify (submit) the transaction. If the box is ticked, the first user acting on the transaction needs to have the ‘Verifier’ role, apart from all the other conditions of the authorisation matrix being met. |
|
Field Send |
Description Send indicates only a user with the 'Sender' permission can release the transaction to the bank. If the box is ticked, the last user acting on the transaction needs to have the ‘Sender’ role, apart from all the other conditions of the authorisation matrix being met. |
|
Field Sequential |
Description If 'Sequential' is selected, when multiple authorisation levels are required for a transaction, they must be performed in the sequence defined under authorisation levels below. Otherwise, all levels must still authorise the transaction but they can be in any order. |
After filling in this form, click on the button Add Authorisation Level to define the corresponding authorisation levels.
Select the authorisation level that must be applied to the transaction before it can be sent and click Save.
When multiple levels are selected, a user defined with each level is required to authorise the transaction before it can be submitted. When multiple authorisation levels are selected, and the Sequential check box is ticked, users with each level of authority must authorise the transaction, in the order shown. (A user can have only one authorisation level. See User Maintenance> Profiles)
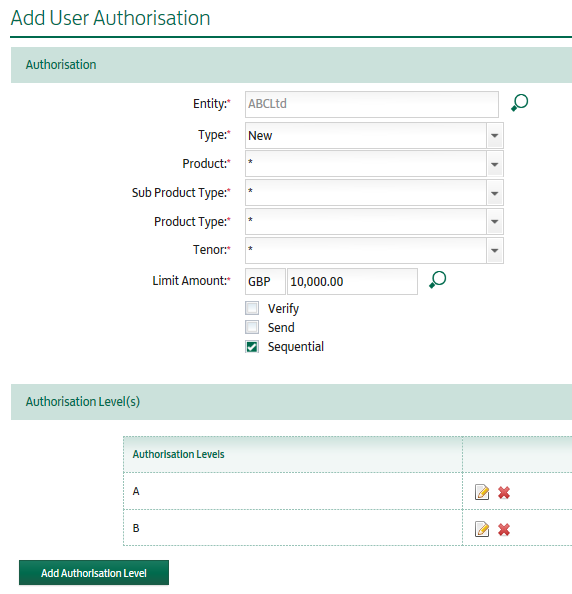
You want to have an authorisation line set up that enables the users with this level of authority to:
You would have to follow the below steps:
|
Step |
Action |
|---|---|
|
Step 1 |
Action Click on the icon Add a new Authorisation |
|
Step 2 |
Action Click the magnifying glass next to the Entity field and select ‘ABCLtd’ to define the entity this authorisation matrix applies to. |
|
Step 3 |
Action Select ‘New’ for the Type drop down list to define the transaction type this authorisation matrix applies to. |
|
Step 4 |
Action Select ‘*’ for the Product drop down list to define the products this authorisation matrix applies to. |
|
Step 5 |
Action Select ‘*’ for the Sub Product Type drop down list. |
|
Step 6 |
Action Select ‘*’ for the Product Type drop down list. |
|
Step 7 |
Action Select ‘*’ for the Tenor drop down list. |
|
Step 8 |
Action In the next field you are then able to specify the limit amount of your transactions, so in this example it will be GBP 10,000. |
|
Step 9 |
Action You can then add two authorisation levels for this matrix, first an A level and then a B level. Click Save after adding each of them. |
|
Step 10 |
Action For the matrix to impose a direction between the A and B levels (A=>B), tick the ‘Sequential’ tick box. |
|
Step 11 |
Action Once this has been done click Submit |

As part of the transaction processing cycle for this authorisation matrix, the first user that authorises and submits a new transaction needs to have an A authorisation level and the second user that authorises the transaction and releases it to Lloyds Bank needs to have a B authorisation level.
For more information on User Profiles click here.
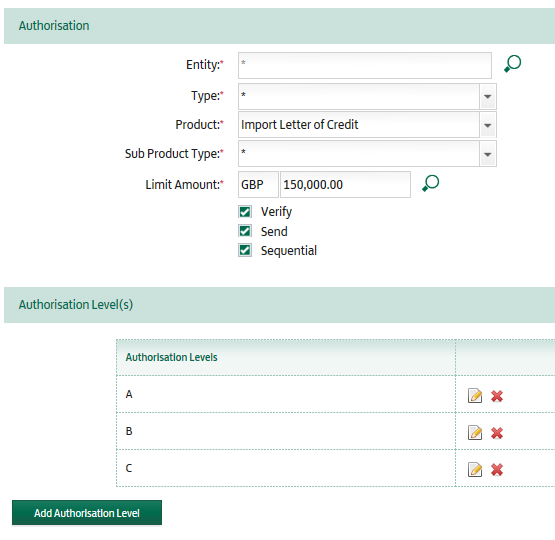
You want to have an authorisation line set up that enables the users with this level of authority to:
You would have to follow the below steps:
|
Step |
Action |
|---|---|
|
Step 1 |
Action Click on the icon Add a new Authorisation |
|
Step 2 |
Action Click the magnifying glass next to the Entity field and select ‘*’ to define the entity this authorisation matrix applies to. |
|
Step 3 |
Action Select ‘*’ for the Type drop down list to define the transaction type this authorisation matrix applies to. |
|
Step 4 |
Action Select ‘Import Letter of Credit’ for the Product drop down list to define the product this authorisation matrix applies to. |
|
Step 5 |
Action Select ‘*’ for the Sub Product Type drop down list. |
|
Step 6 |
Action Select ‘*’ for the Tenor drop down list. |
|
Step 7 |
Action In the next field you are then able to specify the limit amount of your transactions, so in this example it will be GBP 150,000. |
|
Step 8 |
Action You can then add three authorisation levels for this matrix, an A level, a B level and a C level. Click Save after adding each of them. |
|
Step 9 |
Action Tick the ‘Verify’ tick box in order for the authorisation matrix to check that the first user acting on the transaction has the Verifier permission. |
|
Step 10 |
Action Tick the ‘Send’ tick box in order for the authorisation matrix to check that the first user acting on the transaction has the Sender permission. |
|
Step 11 |
Action For the matrix to impose a direction between the A, B and C levels (A=>B=>), tick the ‘Sequential’ tick box. |
|
Step 12 |
Action Once this has been done click Submit. |

As part of the transaction processing cycle for this authorisation matrix:
For more information on User Profiles click here.
Lending is subject to status.